• Skip to primary navigation
  • Skip to main content
  • Skip to primary sidebar

HookedOnPlants

When getting hooked is a good thing

  • Jules
  • Why Vegan?
  • Optimize Your Diet
  • Podcast
  • Recipes
  • Shop For the Animals
  • Free Breakfast Recipe Book
  • Contact

Uncategorized

Vegan SacherTorte aka Dense Chocolate Cake

January 18, 2018 By julia

Make this Vegan Sachertorte cake and eat it too.

The Vegan Sachertorte…sounds sinful doesn’t it?

Good.

Because you can feel sinful without actually committing a sin. That’s where this cake comes in.

Usually my recipes on here avoid any kind of refined sugar or flours, but you have to make an exception every now and then. I’m not telling you this is a health food because it’s vegan. But I want you to know that while eating whole, unprocessed, plant foods most of the time, you definitely can have the decadent chocolate cake that you’ve always loved, even if you go plant-based. And, it’s definitely a lot better than the traditional Sachertorte recipe that has 6 eggs and lots of butter. SO YES. Make this for a special occasion!

This dense chocolate cake that used to consist of lots of eggs and butter was staple at every birthday before going vegan. And, I’m not going to lie, it was SO delicious.

One of my Mom’s specialties.

From spending years in Europe (competing on the World Cup Freestyle circuit in the 70s- go Mom), my Mom picked up some pretty mean skills in the kitchen when it came to European desserts. Hence, her nickname on the street is now the ‘Dessert Queen’ (you wouldn’t guess it by looking at her). Since she made the switch to the plant-based lifestyle, she was a bit confused about what to make for birthdays, New Years, Christmas and well, you know… those times that Sachertorte and Tarté Tatin were an absolute must to wow people’s taste buds après dinner.

Well folks, we have proven today that as vegans we CAN make this cake AND eat it too.

Not only is it veganized… but it’s easier, less time consuming, better for us, and tastes just as good, if not even better than the original chocolate sachertorte!

WINNING.

It’s dense. It’s sultry. It’s chocolate-y… oooo is it ever chocolate-y. It’s easy. It’s … just something you need to devour at the next birthday party.

The ganache on top is the easiest thing you might ever make, but your friend’s won’t believe it.

For the layer between, we used my Mama’s famous Holiday marmalade, but feel free to use your favourite jam or anything you have kickin’ around the fridge.

If you make this, I’d love to see your creation!

Tag me on instagram @hookedonplants

In other news, if you’re in the US, pick up a copy of the Alive Health Magazine this month! The full article of how I got Hooked On Plants is in there!


Vegan Sachertorte aka Dense Chocolate Birthday Cake
 
Save Print
Prep time
25 mins
Cook time
30 mins
Total time
55 mins
 
A dense chocolate cake with zero eggs, cream or butter! This Vegan Sacrhertorte is easier and tastier than the original version, and it goes perfectly with birthday candles.
Author: Jules
Recipe type: Dessert, Cake, Birthday
Serves: 12
Ingredients
  • Cake:
  • 1½ cups all purpose flour
  • 1 cup sugar
  • ½ cup unsweetened cocoa powder
  • 1 tbsp cinnamon
  • 1 tsp baking soda
  • ¼ tsp salt
  • 1 tbsp vanilla extract
  • 1 tbsp balsamic vinegar
  • 1 cup cold water
  • ½ cup marmalade or jam
  • (br) Ganache (chocolate sauce):
  • ⅔ cup powdered sugar
  • ⅓ cup unsweetened cocoa powder
  • 2-3 tbsp water
Instructions
  1. Preheat oven to 350°F
  2. Cover the bottom of an 8" spring form round cake pan with a cut circle of parchment paper.
  3. In a large mixing bowl, or kitchen aid, whisk together first 6 ingredients (until the salt)
  4. Form 2 wells in the mixture, and fill one with the vanilla, and one with the balsamic vinegar. Then, pour water over everything.
  5. Mix until everything is moist. A few little bumps are fine.
  6. Pour the batter into your cake pan.
  7. Bake for 30-35 minutes (stick a tooth pick in the centre of the cake and it should come out clean)
  8. Cool in the pan for 5-10 minutes.
  9. Use a spatula to make sure the sides of the cake aren't stuck to your pan. Place a serving plate upside down on the pan, and flip it. Now your cake is on the serving plate ready to make pretty.
  10. Spread a layer of jam or marmalade over the top.
  11. Place the cake in the fridge for a few minutes while you make the ganache.
  12. Make the ganache by whisking together the powdered cocoa and powdered sugar in a bowl. Then add water and stir to make a thick glaze.
  13. Spread the glaze over the jam layer, allowing some to drip over the sides (drooooool).
  14. Chill in the fridge for 10 minutes for ganache to solidify
  15. To finish it off, place a paper stencil in the middle of the cake (like a star), and sprinkle powdered sugar over the whole thing through a sieve. Remove the stencil carefully, and serve!
3.5.3226

Approved by 3 generations


Filed Under: Dessert, Holidays, Oil Free, Recipes, Salt Free, Uncategorized Tagged With: animal free cake, birthday cake, chocolate birthday cake, chocolate cake, dense chocolate cake, easy chocolate cake, hooked on plants, plant based chocolate cake, plant based chocolate sauce, plantbased dessert, sachertorte, simple cake, vegan chocolate cake, vegan chocolate sauce, vegan dessert, vegan ganache, vegan sachertorte

Next Level Vegan Lasagna with Creamy Tofu Ricotta

January 11, 2018 By julia

Plant-based comfort food to the max. Vegan Lasagna. Or is it lasagne? We’ll stick with the first one.

Lasagna. This word usually means the cheesiest, most tomato-y pasta bake you’ll ever have.

Well, this lasagna still brings that, without the cheese.

Your taste buds and comfort-feels will be completely satisfied while the tofu ricotta and roasted garlic hummus come together to create the most decadent party-in-your-mouth lasagna experience ever.

This vegan lasagna is a good dish to serve up after the holiday indulgence. Your palate is probably still craving that comforting meal, but your brain and bod are begging for that lighter, get-back-to-the-greens kind of meal. Ya know what I mean?

Not to mention there’s just something special about diving your fork into the layered masterpiece we know and love as lasagna.

All that’s in between you and this yumminess is…

Mix

Sauté

Layer

Bake.

Easy it up by using store-bought hummus and tomato pasta sauce.

Or, go for it and make your own roasted garlic hummus from this recipe (double it so you have extra, because what’s a fridge without a tub of hummus anyway…)!

Benefits:

–Brown rice pasta is the pasta for you if you’re sensitive to gluten at all. Pasta isn’t something to be afraid of! YES, avoid white pasta (which is completely stripped of it’s nutrients, vitamins, and fibre), but the other options like quinoa pasta, sprouted whole grain pasta, spelt pasta etc… are all great options! 

–Miso Paste is fermented soy that gives the dish a salty, umami taste. It also is packed with beneficial probiotics to help combat digestive issues by balancing out your gut micro flora. Plus it takes this vegan lasagna to the next level.

–Spinach (lots of it) is pop eye’s fave. I mean common’ what’s not to love. It’s packed with plant protein, chlorophyll, and when it’s cooked you’ll absorb higher levels of vitamins A and E, protein, fibre, zinc, thiamin, calcium, and iron!


Next Level Vegan Lasagna + Creamy Tofu Ricotta
 
Save Print
Prep time
25 mins
Cook time
40 mins
Total time
1 hour 5 mins
 
Cheezy and creamy tofu ricotta make this lasagne a plant-based comfort food staple, and one that won't bust your belt!
Author: Jules
Recipe type: lasagna, pasta, dinner, lunch
Cuisine: Italian
Serves: 10
Ingredients
  • 1 package brown rice lasagna pasta
  • 2 cups (one large jar) tomato basil marinara sauce
  • 6 large cremini mushrooms, chopped
  • 1 large sweet onion, diced
  • 2 cloves garlic, minced
  • 1 tbsp vegetable bouillon powder
  • 2 small or 1 large zucchini, chopped
  • 1 cup frozen peas
  • 2-3 cups packed spinach, chopped
  • ½ cup nutritional yeast
Tofu Ricotta:
  • 1 package firm tofu, pressed 15 minutes (or put in 110°F dehydrator for 1 hour)
  • ¾ cup roasted garlic hummus (store bought, or make this recipe)
  • 7 large leaves of basil, chopped
  • 1 tsp salt
  • 2 tbsp miso paste
  • ¾ cup nutritional yeast
Instructions
  1. Make the hummus (or used store-bought).
  2. Pre-heat oven to 400°F. While you're at it, press your tofu if you haven't already (I use a plate, then wrap the tofu in a tea towel, then stack books or a heavy bread board on top for 10 minutes at least)
  3. Heat a pan to medium. Add the onions and mushrooms until the pan browns, then de-caramelize the pan with a bit of water. Add the garlic, vegetable bouillon, and zucchini. Let sauté a few minutes (add a splash of water if it's sticking). Add the peas and spinach. Let sauté a few more minutes until the spinach is cooked down.
  4. Bring a pot of water to a boil, and cook the pasta noodles 2 minutes less than recommended on the package (this helps them stay in tact for layering). Rinse immediately with cold water to prevent them from sticking.
  5. Meanwhile, make the tofu ricotta! Crumble the pressed tofu into a bowl with all the other tofu ricotta ingredients. Mix well to combine. Steal a taste. It's delicious.
  6. In a 12 x 8 inch baking dish, assemble the lasagna: First a thin layer of tomato sauce, Second a layer of ⅓ of the noodles, Third, a layer of ½ the ricotta, Fourth a layer of ½ the sautéed veggies, and again, tomato sauce, ⅓ of the noodles, the rest of the ricotta, the rest of the veggies. Finish it off with the last of the noodles, rest of the tomato sauce, and a generous sprinkle of nutritional yeast.
  7. Cover with tin foil and bake for 40 minutes.
  8. Take tinfoil off and bake for 5 more minutes.
  9. Remove and serve. Will keep for up to 5 days in the fridge.
3.5.3226

Sign up here for your free PDF “7 Steps to Add More Plants to Your Life” (+ exclusive resources & tips)!

Filed Under: Dinner, Gluten Free, Lunch, Oil Free, Recipes, Uncategorized Tagged With: hooked on plants, lasagna, pasta bake, plant based dinner, plant-based batch cooking, plant-based comfort food, vegan comfort food, vegan dinner, vegan lasagna, vegan lunch, vegan pasta, vegan ricotta

Roasted Garlic Oil-Free Hummus

January 4, 2018 By julia

Roasted garlic hummus is a staple that should be waiting for you in your fridge at all times.

Spread it, dip it, smother it all over everything.

Even add a tablespoon to some water, and voila: salad dressing!

The flavour and texture of this hummus is on point, and will bring any bland sandwiches, wraps, macro bowls, or veggies to life.

What I love about this hummus, is the oil-free action. Unless you’re suffering from heart disease, you’re fine to have some oil here and there. But when it comes down to it, oil is refined fat with the fibre and water content stripped from what ever  whole food ingredient it’s made of. I always say to eat the whole food instead of the refined version (olives, instead of olive oil, sesame seeds instead of sesame seed oil, flax seeds instead of flax oil, avocados instead of avocado oil… you get my drift).

Adding oil to dressings and sauces is a good way to gain some weight if you need to, but limiting it by making versions of your favourite condiments without oil is a great way to shed some pounds, if that’s what you’re going for.

I personally can’t stop dipping my veggies if there’s hummus kicking around. So, the less refined fat calories there are in the stuff, the better (keep on dippin’ baby!)

The roasted garlic gives this hummus a creamy feel and deep flavour.

Other magical ingredients to add to your hummus for flavour, minus the oil, are:

  • miso paste
  • tamari
  • nutritional yeast
  • coconut aminos
  • pickle juice
  • Worcestershire sauce
  • fresh herbs and spices (dill, paprika, cumin, curry, chipotle, parsley, chives…)
  • Sriracha


Roasted Garlic Oil-Free Hummus
 
Save Print
Prep time
50 mins
Cook time
45 mins
Total time
1 hour 35 mins
 
A hummus with exceptional flavour, but no refined oils, so you can snack on for days.
Author: Jules
Recipe type: snack, appetizer
Serves: 1 cup
Ingredients
  • 1 can chickpeas, drained (keep aquafaba/chickpea liquid in your fridge for other recipes)
  • 1 head of garlic
  • 2 tbsp tahini
  • 1 tbsp miso paste
  • Juice of 1 lemon juice (about ¼ cup of juice)
  • Optional: Nutritional yeast to taste (for a cheezier flavour)
Instructions
  1. Heat the oven to 375°F
  2. First, cut off the top of the head of garlic (so you can see the tops of each individual clove).
  3. Peel off the loose outer layers of garlic paper and wrap it up tight in aluminum foil
  4. Place it in the middle rack and roast for approximately forty-five minutes or until you can easily pierce the garlic with a sharp knife. The cloves should look caramelized and brown.
  5. Squeeze the roasted garlic cloves out and add them to a food processor with all the other ingredients.
  6. Blend until smooth!
3.5.3226

Sign up here for your free PDF “7 Steps to Add More Plants to Your Life” (+ exclusive resources & tips)!

Filed Under: Appetizers, Gluten Free, Lunch, Oil Free, Salt Free, Sauces/Dressings, Snacks, Uncategorized Tagged With: garlic hummus, hooked on plants, hummus, roasted garlic hummus, vegan appetizer, vegan food, vegan snack

Peppermint Goji Pistachio Chocolate Bark | Raw Vegan & from Scratch

December 28, 2017 By julia

Raw Chocolate Bark! With a kick of peppermint, a sprinkle of goji berries and dusting of pistachios…all from scratch.

Yup, this time it’s more than just melting a store bought chocolate bar. We’re using the raw form of chocolate to keep it extra nutritious and magical.

Cacao butter is the magic I’m talking about.

You can get cacao butter at your local health food store, or Spud.ca carries it (the code ‘crvan-murjub’ at the check out will get you some $ off).

By melting half of this down, adding some raw cacao powder then swirling in the other half to create a galaxy of Christmas swirls, be prepared to be the star of the New Year’s Party this year!

Quality, nutrient-dense ingredients, it’s fancy looking, tastes delicious, and festive.

And YES it is actually good for you. Chocolate in it’s pure form is extremely beneficial in so many ways. It’s what’s added to the cacao in the commercial chocolate making process that makes most chocolate from the store something to skip (I’m talking added dairy, refined sugars, and the process of high heat roasting the cacao goes through to become a commercial chocolate to be sold). Raw cacao, on the other hand, is so beneficial that it once was used as currency in Mexico!

Benefits:

  • Raw Cacao comes in the form of nibs, powder, and butter… all extracted from the fermentation of the cacao bean. It’s PACKED with antioxidants (40x the amount of blueberries!), which wards of disease, slows down aging and fights off free radicals and inflammation. Raw cacao also has phenylethylamine, which is responsible for increasing the receptors of the feelings of pleasure (like the way we feel when we’re in love). It increases your mental alertness as well as your mood!
  • Goji berries contain about 2-4 times the amount of antioxidants than blueberries, and 500 times more vitamin C than oranges to boost the immune system!
  • Pistachios are also packed with antioxidants to ward off free radicals. Out of all the nuts, they contain the most lutein and zeaxanthin for healthy eyes. They’re also packed with fibre, protein and b6!

To simplify this recipe even further, just ditch the swirls and just give the dark chocolate all spotlight. Sprinkle it with shredded coconut, and you have Christmas in the form of chocolate!

Happy Holidays!! I hope you can share this deliciousness with the ones you love deeeeaaarly.

Don’t be afraid to serve it up as an appetizer with bubbles!


Raw Peppermint Chocolate Bark | From Scratch
 
Save Print
Prep time
1 hour
Total time
1 hour
 
Bring this everywhere you go this Holiday! This peppermint bark made from raw cacao is delicious, simple, festive and elegant.
Author: Jules
Recipe type: dessert, snack
Cuisine: christmas, holidays, sweets
Serves: 10
Ingredients
  • 2 cups cacao butter
  • ⅓ cup raw cacao powder
  • ¼ cup maple syrup
  • 2 tsp vanilla extract
  • ¼ tsp peppermint extract
  • ½ cup goji berries
  • ½ cup raw or roasted pistachios, chopped (shells removed)
Instructions
  1. Cover a pan or plate (about 7 inches wide) with parchment paper.
  2. Set up two double boilers (one will be for the white chocolate, one for the dark): add two inches of water to 2 saucepans and bring them to a simmer. Place a heat proof bowl (glass, stainless steel, or another pot (if it fits without falling into the water)) on top of the simmering water in the sauce pan (there should be about 1-2 inches of space between the water and bottom of the bowl).
  3. Separate the cacao butter in half, then add one half to each of the double boilers. Stir until melted.
  4. In the first bowl, add all of the cacao powder, half of the maple syrup, half of the vanilla, and half of the peppermint.
  5. In the second bowl, add the other half of the maple syrup, vanilla and peppermint.
  6. Whisk each until mixed thoroughly (cleaning the whisk between bowl switches).
  7. Remove the dark chocolate bowl, and dry the bottom of the bowl on a kitchen towel; this will prevent steamy water drops from mixing in with your dark chocolate.
  8. Pour the dark chocolate over the parchment covered pan.
  9. Remove the white chocolate in the same way, and dry the bowl. With a spoon, pour dollops of white chocolate in the dark. Try to create 1 inch polka dots of white all over the dark.
  10. With a chopstick or the end of a spoon, swirl the chocolates together (SO satisfying).
  11. Place the plate in the fridge for 10 minutes.
  12. Take it out and sprinkle the goji berries and pistachios all over. Feel free to add anything else you want here!
  13. Place the plate in the fridge for 1 hour, or freezer for 30 minutes.
  14. Once solid, break apart into bark.
  15. Store in a Tupperware in the fridge. Bring to all the Christmas parties.
  16. **Simplify this recipe by taking out the swirls to make it solid dark chocolate. Just use one double broiler and add the ingredients to the bowl as you would normally for the dark chocolate part. **
3.5.3226

Plant-based newbie?

Try out the 80/20 Plants app

Filed Under: Appetizers, Dessert, Gluten Free, Holidays, Raw, Recipes, Salt Free, Snacks, Uncategorized, Winter Tagged With: bark, cacao bark, cacao butter, chocolate bark, chocolate dessert, christmas bark, christmas recipe, goji berry, holiday gift, holiday recipe, hooked on plants, peppermint bark, pistachio bark, plant based dessert, raw cacao, raw chocolate, vegan dessert

Perfect French Fries | Crispy & Oil-Free

December 14, 2017 By julia

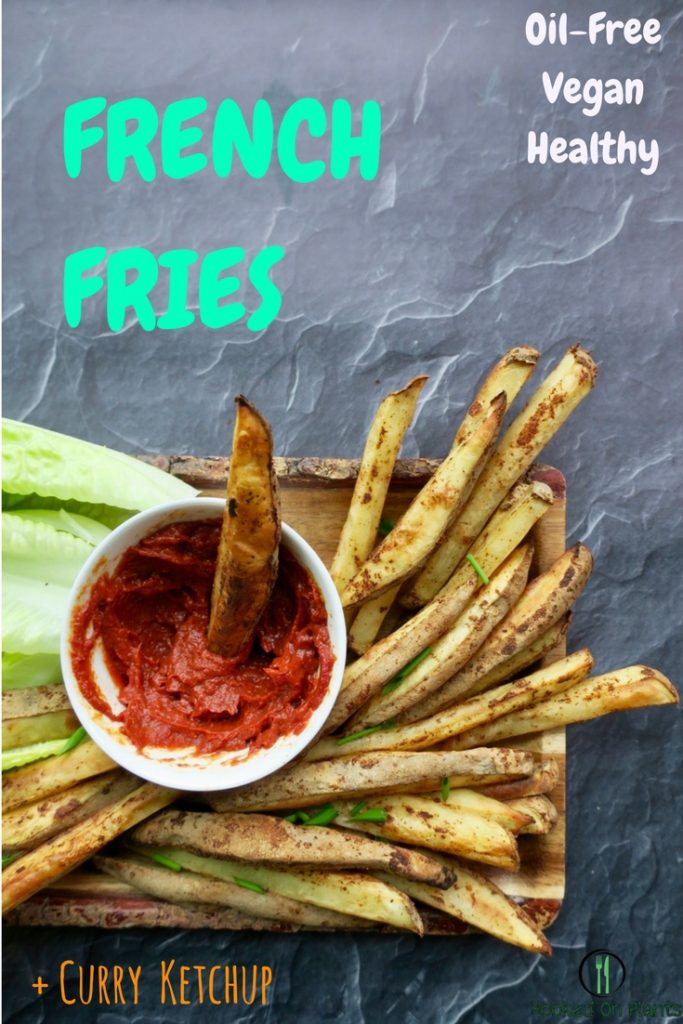
Don’t be a afraid of the tater! Especially when they’re perfect french fries made right.

The poor potato has such a bad reputation.

I’m here to tell you: it’s not the potato’s fault, it’s the way humans have prepared it. Fryin’ it up into french fries or chips creates a saturated calorie bomb with all the wrong fats. Hydrogenated fat being the worst of them all.

The reason being,“hydrogenated fats are difficult for the body to “grab onto” and metabolize, and can neither be incorporated into cell structures nor excreted in the normal fashion. Thus, hydrogenated or “trans-” fats tend to remain “stuck” in blood circulation, becoming oxidized and most importantly, contributing significantly to an increased risk for cardiovascular disease and possibly also cancer.” ~ World’s Healthiest Foods.com 

So, we go back to that simple fact that eating a food in it’s whole form is just the bomb dot com.

A potato is actually one of the most perfect foods around… if you eat it in it’s whole form as a potato, baked or boiled without any extra oils or deep fryin’.

Come as you are potato! Come as you are.

Of course, upping the anti and adding spices or healthy sauces to the experience makes the naked spud shine brighter than the best potato chip or french fry you’ve ever bought!

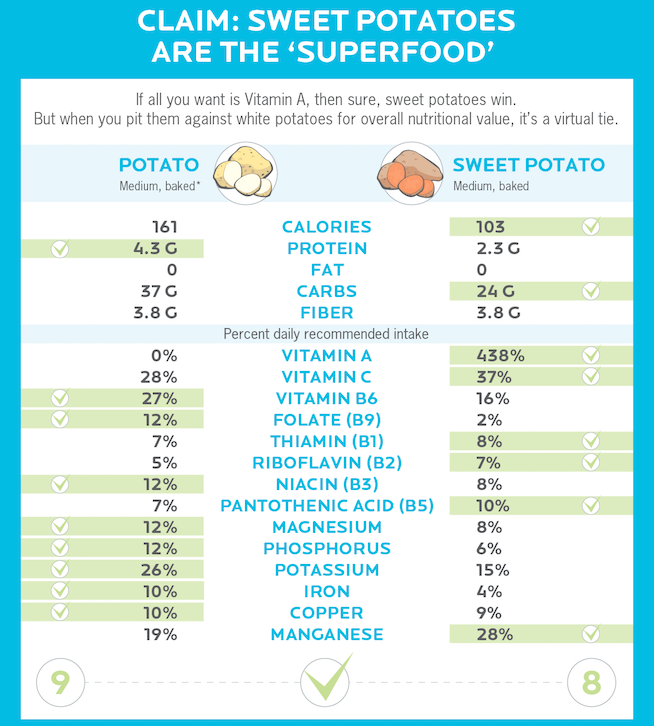
This can be done with sweet potatoes too! But, you might be surprise to know that they’re not much different in nutrition than the white potato!

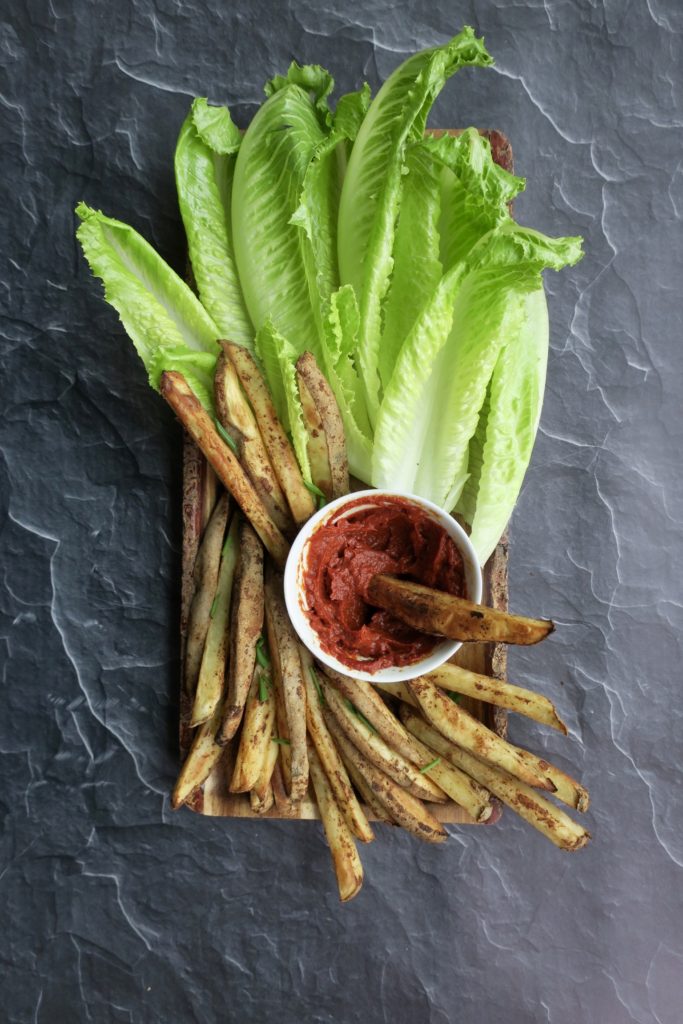
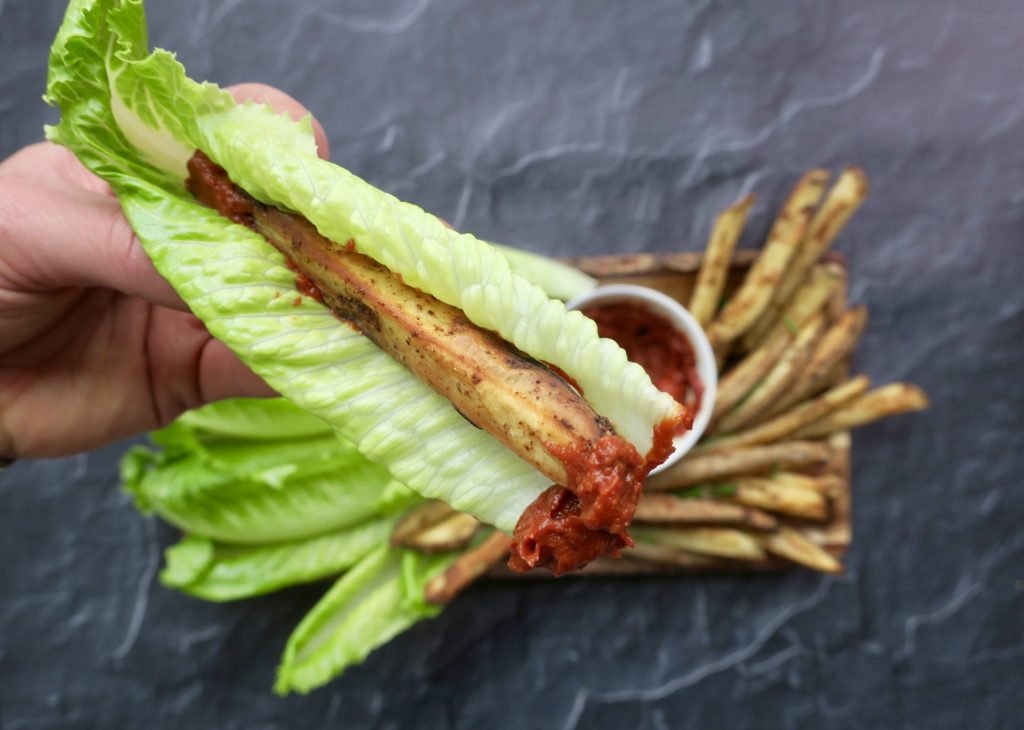
My favourite way to eat these is in a boat. Get that romaine out, throw a fry in there, then take a dip.

Savoury heaven.

Benefits of potatoes:

  • packed with vitamins, minerals and fibre
  • no saturated fat, sodium or cholesterol
  • more potassium than a banana
  • a great source of vitamin B6 (for mood, brain function and eyesight),
  • magnesium is in these babies to reduce anxiety, plus relieve muscle aches and migraines
  • antioxidants are in there for combat disease and protect your cells from free radicals


Perfect French Fries | Crispy & Oil-Free
 
Save Print
Prep time
10 mins
Cook time
35 mins
Total time
45 mins
 
These fries are crispy and completely guilt-free. Let's fall in love with the potato again in it's whole-food, naked form. This is a go-to simple dinner idea, or a great appetizer dish for a potluck.
Author: Jules
Recipe type: dinner, appetizer
Cuisine: Canadian, potluck, simple
Serves: 2
Ingredients
  • 3-4 Russet potatoes
  • 1 tbsp garlic powder
  • 1 tsp paprika
  • 1 tsp salt (optional)
  • (Get creative with your spices! These are good: curry, cumin, onion powder, tarragon)

  • Curry Ketchup Sauce:
  • ¼ cup tomato paste
  • 1 tbsp Dijon Mustard
  • 1 tbsp curry powder
  • 1 tsp maple syrup

  • 1 head romaine lettuce (optional)
Instructions
  1. Pre-heat oven to 400°F
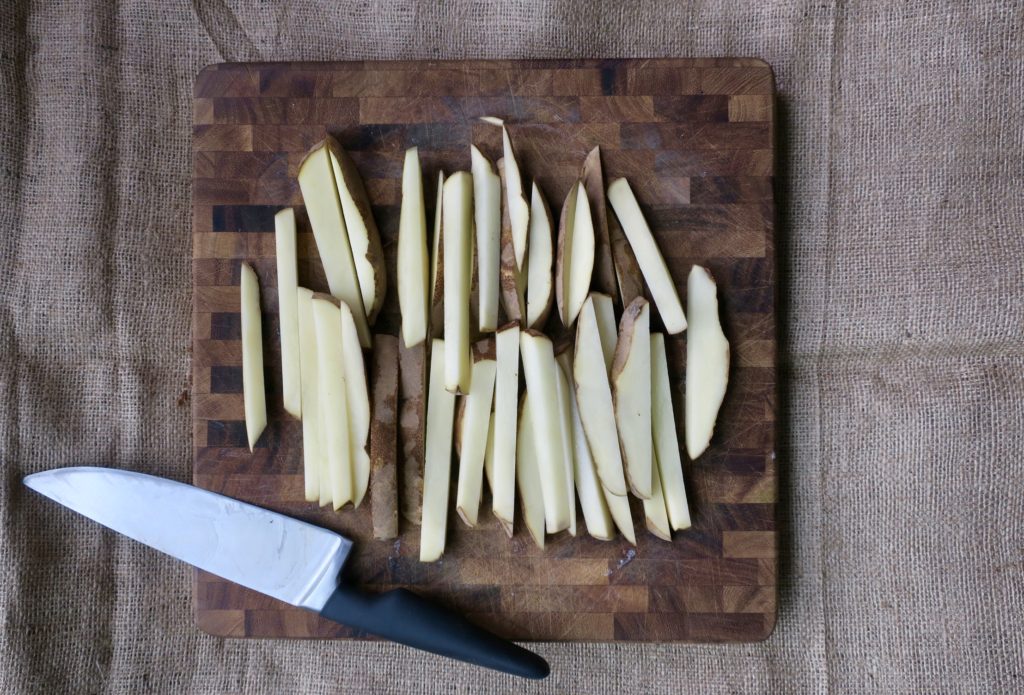
  2. Chop potatoes into thick fry-shape slices
  3. Pour them into a zip-lock bag with the spices and shake shake shake until evenly coated (kitchen dancing recommended)
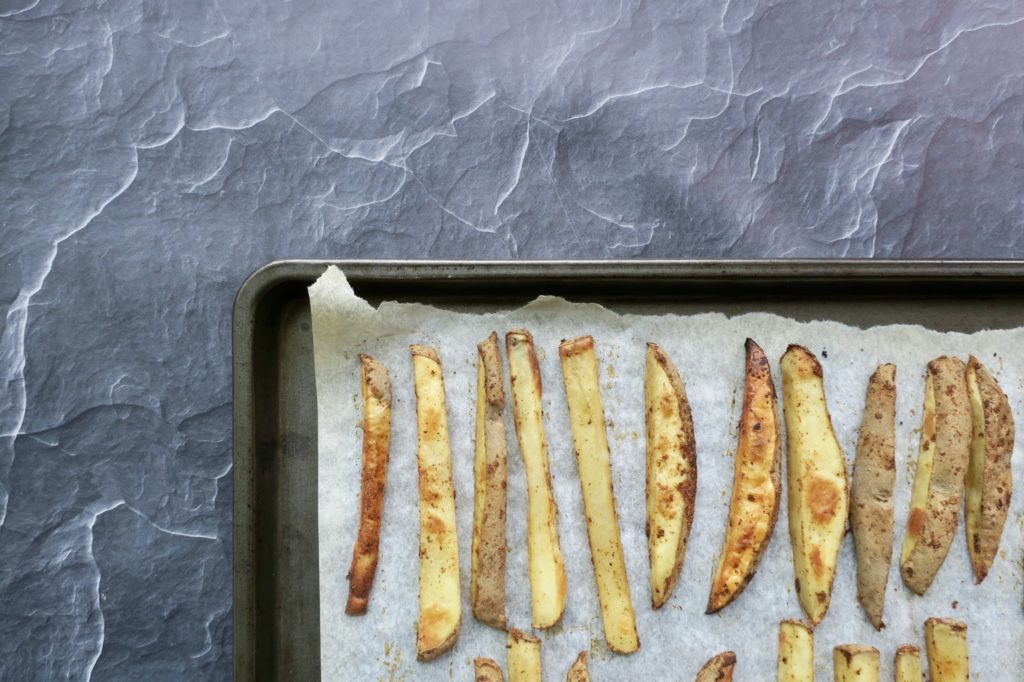
  4. Spread the fries evenly across a parchment or silicone mat- covered baking tray (if you want em' crisp, don't let them touch)
  5. Bake for 20 minutes, then flip each one over.
  6. Bake for another 15 minutes, or until you can see the golden brown edges puffing up
  7. Mix all sauce ingredients together
  8. Serve in a romaine leaf and dip it all in your sauce!
3.5.3226


Filed Under: Appetizers, Dinner, Gluten Free, Lunch, Oil Free, Recipes, Salt Free, Snacks, Spring, Summer, Uncategorized, Winter Tagged With: baked french fries, crispy fries, curry ketchup, dipping potatoes, french fries, high carb, hooked on plants, low fat, oil free fries, potato recipe, spud recipe, vegan dinner, weight loss meal

  • « Go to Previous Page
  • Page 1
  • Interim pages omitted …
  • Page 18
  • Page 19
  • Page 20
  • Page 21
  • Page 22
  • Interim pages omitted …
  • Page 32
  • Go to Next Page »

Primary Sidebar

Search Recipes

WELCOME

welcome-julia-murray

Hi, I'm Julia! I like to simplify plant-based eating and make yummy recipes. I'm a Registered Holistic Nutritionist, certified plant-based chef, Olympian, and I make cereal (Jules Fuel). Enjoy! Read more

Instagram

[instagram-feed]

Categories

  • Appetizers (24)
  • Breakfast (40)
  • Brunch (9)
  • Dessert (66)
  • Dinner (82)
  • Drinks (7)
  • fall (4)
  • Gluten Free (99)
  • halloween (2)
  • Holidays (20)
  • Hooked On People Interviews (19)
  • Jules Fuel (5)
  • Lifestyle (22)
  • Lunch (82)
  • Oil Free (93)
  • One Pot (1)
  • Raw (45)
  • Ready under 30 (1)
  • Recipes (159)
  • Salt Free (42)
  • Sauces/Dressings (34)
  • Snacks (80)
  • Spring (42)
  • Summer (43)
  • Thanksgiving (13)
  • Travel (1)
  • Uncategorized (158)
  • Vegan Dogs (1)
  • Veganism (16)
  • Winter (32)

© 2016 Veritas Techsoft Pvt. Ltd

Please wait...

Free recipes to your inbox

Get inspired by receiving delicious whole food, plant-based recipes
Click for delish!